AeroEgg AET-H743-BASIC: Driver Installation and Firmware Flashing
Introduction: This article explains only how to flash arbitrary firmware through DFU. Upgrade procedures specific to certain firmware, such as updating ArduPilot through the bootloader, are outside its scope. DFU is boot code permanently embedded in the flight controller MCU. Holding the BOOT button while applying power enables firmware flashing over USB, so this procedure does not risk permanently bricking the controller.
Physical Connection
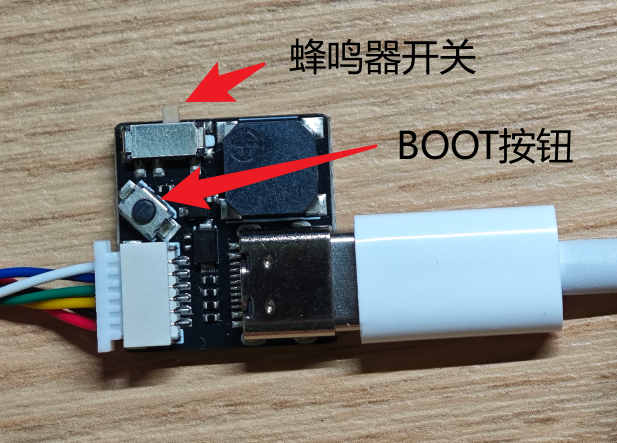
Use a Type-C data cable that supports USB2.0. Hold the BOOT button, then connect the flight controller to the Windows computer. Most genuine phone charging cables work correctly, but some Huawei cables have been reported to cause connection errors. If this occurs, use a different cable.
Important:
- The buzzer switch does not affect the USB connection and does not need to be moved.
- Hold the BOOT button before powering the flight controller, then release it after power is applied.
- Do not connect a battery.
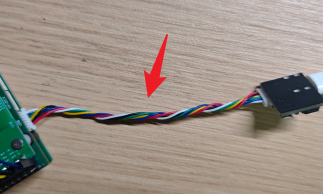
In rare cases, Windows may display “USB device not recognized” after connection. Try reconnecting the USB cable and the cable between the USB daughterboard and flight controller. You can also twist the interconnect cable to reduce interference and try again.
Driver Installation
When powered on while the BOOT button is held, the flight controller enters DFU mode. In this mode, only the power LED remains on; both status LEDs remain off.
A new Windows computer normally does not include a DFU driver. However, a computer previously configured for another flight controller or STM32 development may already have one installed. Check the current driver status first:
After connecting the flight controller, open Windows Device Manager by right-clicking the Windows icon in the lower-left corner and selecting “Device Manager.” Look for the “Universal Serial Bus devices” category. Expand it and check for “DFU in FS Mode.” If this device is present without a yellow exclamation mark, the driver is already installed.

If it is not present, install the driver using any one of the following methods:
1. Install the Driver with zadig
Click here to download the zadig driver installation tool, then follow these steps:
- Completely close or uninstall all antivirus software. Testing indicates that the built-in Windows defender does not interfere and does not need to be disabled.
- Open zadig.
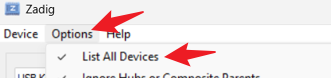
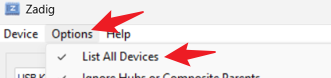
- Under Option, enable List All Devices
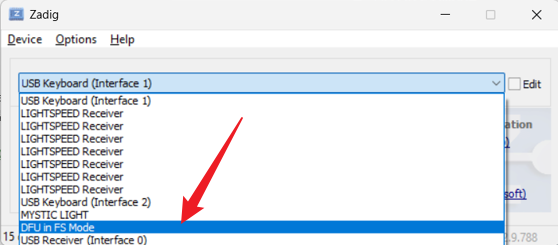
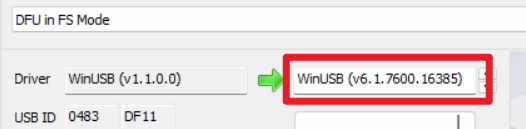
- From the device drop-down list, select the DFU device. If it is not immediately obvious, look for names containing “DFU,” “STM32,” or “Bootloader.”
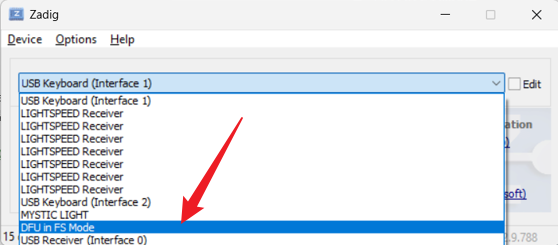 。
。 - Set the driver to WinUSB
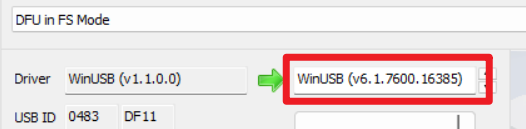 。
。 - Click Upgrade Driver

- Wait several minutes for installation to complete.

2. Install the Driver with STM32CubeProgrammer
- open the STM32 website to download STM32CubeProgrammer. Account registration may be required. Alternatively, you can open our mirror site to download it.
- Extract and install STM32CubeProgrammer. During installation, accept both license agreements and approve the driver installation dialog when it appears. Leave all other options at their defaults.
- After installation, use the procedure above to confirm that the “DFU in FS Mode” device is present. If it appears, the driver was installed successfully.
Firmware Flashing
After the DFU device appears in Device Manager, use any one of the following methods to flash firmware:
1. Flash with INAV Configurator
Note: The firmware flashing function in INAV Configurator provides a DFU flashing interface only; it does not validate the firmware type. INAV Configurator can therefore flash any compatible firmware, including INAV, ArduPilot, and BetaFlight.
- Open INAV Configurator. You can download it here .
- The DFU device should be detected automatically in the upper-right corner
 . If the device does not appear and is also absent from the drop-down list, install the driver correctly as described in the previous section.
 - Click the
 button for “Firmware Flasher.”
 - Click the
 button for “Load Firmware [Local].”
 - Select the required firmware, such as firmware downloaded from here.
- Enable the
 option for “Full chip erase.”
 - Click the
 button for “Flash Firmware.”
 - Wait for flashing to complete.





2. Flash with STM32CubeProgrammer
- Open STM32CubeProgrammer.
- Open the connection-mode drop-down list in the upper-right corner and select USB
 。
。 - Click the refresh button below it. The corresponding USB DFU device should appear
 。
。 - Click Connect to connect to the device
 。
。 - Click Open File in the upper-left area of the main page, then select and open the firmware file
 。
。 - Click the Download button to its right
 and wait for the firmware to be written.
 - Flashing is complete.





3. Flash with MissionPlanner
Warning: MissionPlanner DFU flashing is not fully mature and is not recommended as the primary method.
Note: This function is supported only in MissionPlanner versions later than 1.3.82.
- Open MissionPlanner.
- Do not click the Connect button in the upper-right corner.
- Use the top navigation button to open the
 page, labeled “SETUP.”
 - Click the
 button to open the firmware installation tab.
 - Click the
 button for “Load custom firmware.”
 - Select the firmware file.
- The application asks whether to upload the firmware through DFU. Click OK
 。
。 - The interface may appear unresponsive at this point; this is normal.
- Switch to the MissionPlanner background console. It should display:
Intel HEX image parsed successfully. Device found in DFU mode. - Wait approximately 10-20 minutes. The console will display continuous progress output until flashing is complete.