Supplementary Mode and Parameter Settings for Connecting an AeroEgg AET F405 Flight Controller Directly to a DJI Air Unit with a 6-Pin Cable and Using a DJI FPV 2 Radio Transmitter
1: When the air unit is connected directly, pair the air unit's built-in SBUS receiver with the DJI FPV 2 radio transmitter. UART2 (corresponding to Serial2) is used as the SBUS port. In the port settings, configure Serial2 as follows:
Baud rate Speed 57600
Protocol RCIN
2: The H button on the FPV 2 radio transmitter corresponds to the calibrated CH7 signal range of 1495~1995. CH7 is recommended for controlling RTL. Set RC7_OPTION to 4 in the full parameter list.
3: The M-S-N mode switch on the FPV 2 radio transmitter corresponds to calibrated CH5 values of 995-1495-1995.
CH5 is recommended for selecting the commonly used flight modes. Set FLTMODE to 5 in the full parameter list.
The following configuration is also recommended on the flight mode settings page:
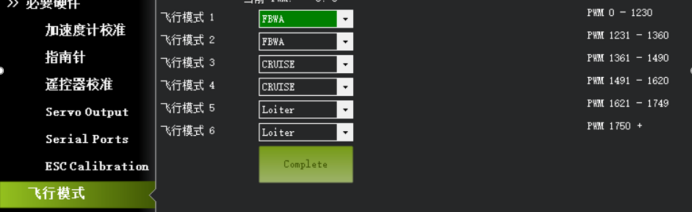
In this configuration, transmitter mode N selects FBWA stabilized mode, mode S selects CRUISE altitude-and-heading hold mode, and mode M selects Loiter position-hold mode.
4: The START/STOP button on the FPV 2 radio transmitter corresponds to calibrated CH8 values of 1495-1995. CH8 is recommended for the TAKEOFF hand-launch mode. Set RC8_OPTION to 77 in the full parameter list.
5: The C1 button on the FPV 2 radio transmitter corresponds to calibrated CH9 values of 1495-1995. CH9 is recommended for MANUAL mode. Set RC9_OPTION to 51 in the full parameter list.
6: The three-position switch on the right side of the FPV 2 radio transmitter corresponds to calibrated CH6 values of 995-1495-1995. It can be configured for three-position flap control as required.